
Road Closures and Detours for March 15 – March 18
Catalina Offshore Products Inc will have its main entrance to our facility blocked off for construction. During this time we will have a detour to enter our facility from a slight detour.
By Rebecca Gardon
 Have you ever wanted to make sushi at home? Customizing your own sushi rolls in the comfort of your home is fun for the whole family and also serves as a great party theme!
While your skill and nuance won’t rival that of trained sushi chefs, basic sushi rolls shouldn’t feel too difficult to recreate. The most important ingredients are quality rice and sushi grade seafood! A good starting point is a spicy tuna roll. We recommend using fresh yellowfin or bigeye (ahi). Below are step-by-step instructions plus a link to a coinciding video.
Spicy Tuna Roll: Getting started
If you’ve never rolled sushi before, you may want to pick up a sushi-making kit, which among other essentials includes rice seasoning, seaweed sheets (nori), a sushi press mold and a sushi rolling mat. Make sure your knife is well sharpened and suited for slicing fish. Have a tall glass of water for dipping the knife when it comes time to cut. Once you’ve prepped your sushi rice, have your other ingredients set up within a hands’ reach of creating your rolls. In the video, the chef uses chopped yellowfin tuna, sliced cucumber, slices of yellowtail and sliced avocado. He also uses some mango salsa and tobikko.
Filling the sushi roll

Make sure that your hands are damp but not dripping. Then grab some sushi rice and pack it into a tight ball. Place the ball of sushi rice on top of a sheet of seaweed and push the rice across the nori evenly. Next, with two fingers pinch the rice toward the edge of the nori. Do the same to the other side until the nori is completely covered with the sushi rice. Flip over the nori so that the uncovered side is facing up.
For the inside of this roll, the chef selects diced yellowfin tuna pieces and slices of cucumber. Used in most sushi rolls across the country, the cucumber adds a desirable crunch. To start rolling you need to take the edge of the nori and fold it over the meat in the center as tightly as possible. The technique is referred to cranking the roll and ensures a tight foundation to the roll. After the tuck is as tight as it can be you want to firmly roll it over the rest of the nori.
Rolling the sushi roll
To finish the sushi roll featured in the video, the chef slices some cuts of yellowtail sushi and places them on top of the roll. The chef also uses a few thin avocado slices to add some nice contrasting colors. He then puts plastic wrap over the roll to keep the foundation tight. With the plastic wrap covering the roll, he uses a sushi mat to compress the roll. When doing this you don’t want to apply too much pressure, but just enough to tighten the roll. Start pressing from the middle to the outsides to evenly shape the contents of the roll. Make sure to pack the edges slightly. At this point you can take the sushi mat off and cut the roll into pieces, dipping your knife in water between slices to keep the rice from sticking. The best way to end up with the same-sized pieces is to cut the roll in halves and halves again to the desired width. An average roll can be cut into eight pieces
Presenting the sushi roll
Once the sushi roll is prepared, it’s time to plate the dish. The video shows a basic way to arrange your sushi by arranging the slices symmetrically along the plate. For a touch of California style, the chef spreads a light mango salsa on top of the roll to add a bit of sweetness to the dish. He finishes by spreading orange tobikko on top of the roll and splashes it with a dash of sesame seeds. The dish is now ready to be served. You could offer your guests the traditional accompaniments of wasabi and soy, or try a little bit of citrusy ponzu sauce to complement the bright flavor of the mango salsa.
Click HERE to watch these instructions illustrated in a video!

Catalina Offshore Products Inc will have its main entrance to our facility blocked off for construction. During this time we will have a detour to enter our facility from a slight detour.

Catalina Offshore Products Inc announces sale to Beish Holdings Inc., DBA Catalina Offshore Products, as founder Dave Rudie sets sail for retirement after 46 years.
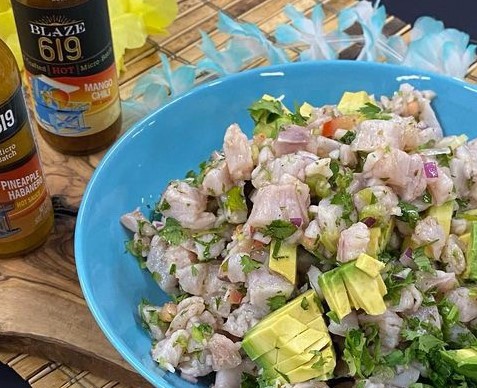
This classic white fish ceviche gets a San Diego-style kick from Blaze 619 Mango Chili and Pineapple Habanero hot sauces.

Road Closures and Detours for March 15 – March 18
Catalina Offshore Products Inc will have its main entrance to our facility blocked off for construction. During this time we will have a detour to enter our facility from a slight detour.

Catalina Offshore Products Inc announces sale to Beish Holdings Inc., DBA Catalina Offshore Products, as founder Dave Rudie sets sail for retirement after 46 years.
Blaze 619 San Diego-Style Ceviche
This classic white fish ceviche gets a San Diego-style kick from Blaze 619 Mango Chili and Pineapple Habanero hot sauces.